
Working with Models

The Model Builder in the Codex platform enables users to create custom models for their organization. It utilizes a variety of fields and content types, which can then be used for creating entries.
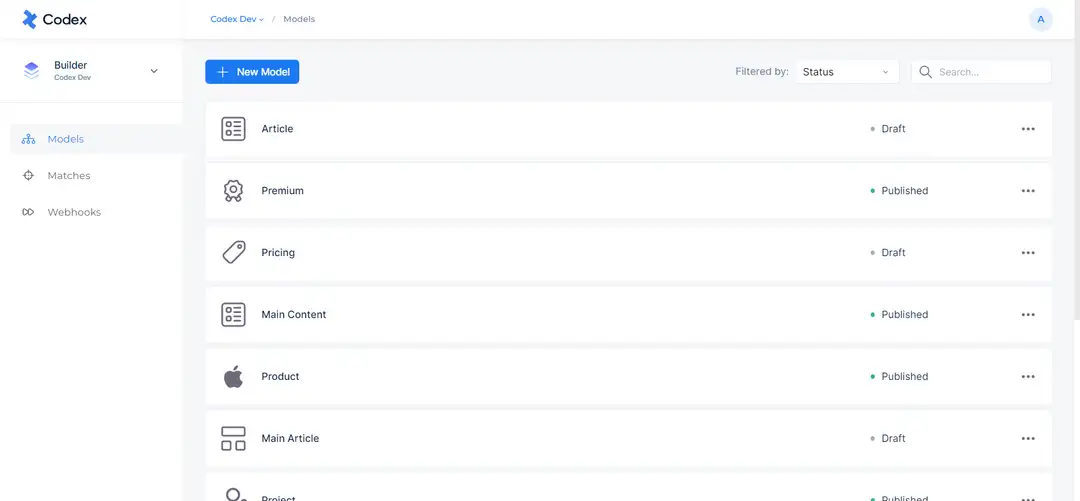
Model Listing Dashboard
To access the Model Listing Dashboard, simply navigate to the Builder component on the left side menu. This dashboard allows you to view, search, and filter all the models created in your organization. Models are displayed with their title, icon, and current status, along with a delete button for easy access. You can also filter the models by their status for convenient and efficient access.
Draft - The draft model indicates that the model is still being edited and will not be shown to users for creating entries until it is complete.
Published - The published model indicates that the model is almost done and is ready to be shown to users for creating entries.
Model Listing Dashboard
Creating a New Model
Models in Codex are organization-level templates that define the structure and data that can be created within the platform. In essence, a content model provides a framework and arrangement for your content, allowing you to organize and structure information efficiently.
To create a new model, follow these steps:
Navigate to the Builder component on the left side menu.
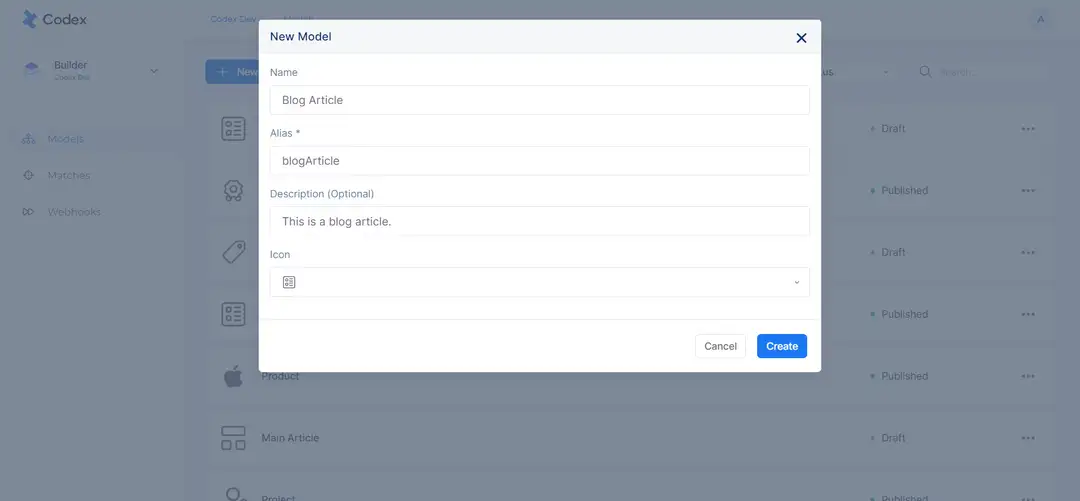
Click on the "New Model" button at the top-left of the models listing page.
A modal will appear with the metadata fields to be filled:
Name: used for display purposes such as listing. This field can be changed later.
Alias: a unique identifier used for the model in the background. This field cannot be changed later.
Description: an optional field used for display purposes.
Icon: used to differentiate the type of the model.
Click on the "Create" button on the bottom of the modal.
You will be directed to the Model Builder where you can start building your model.
Creating a New Model
Model Builder
The Model Builder is the main environment within the Codex platform for creating models for your organization. Using fields and rich content types, you can easily define the structure and configuration of your model. When you first create a model, it is in draft status, allowing you to make changes and modifications before publishing.
Please note that while a model is in draft status, it cannot be used to create entries. Only after the model has been published can editors begin creating entries using that model. This ensures that the model is accurate and ready for use before it is made available to other users in the organization.
Before publishing a model, you must specify the Title Field on the right Side Panel, which can be any of the Text fields within your model. This field will be used to display the model in the model listing dashboard, when creating entries, or in other listings within Codex.
A model in Codex can have multiple fields, each with its own specific data type for the inputs. These data types can include text, numbers, and various other data types including rich content. Such flexibility allows for a wide range of data to be captured and managed within the platform.
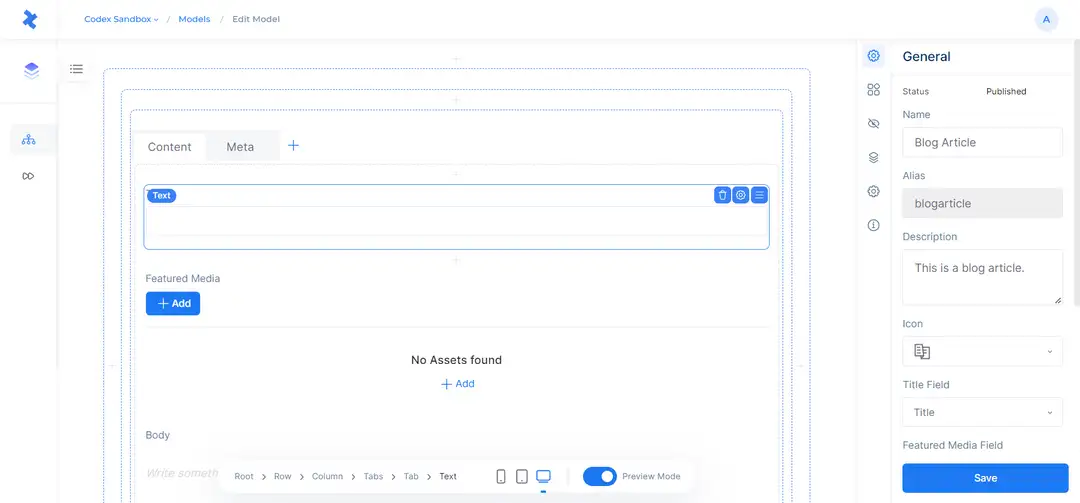
The Model Editor and the Right Side Panel
Side Panel
The Side Panel, located on the right side of the Model Builder, is used to display non-content related information and functionalities. This includes model metadata and various tools for model configuration. The Side Panel consists of six tabs:
General model details
Fields that can be added to the model editor
Disabled fields
Customization
History or versioning of the model
Mapping
General Tab
The General tab within the Side Panel contains the metadata as well as configurations for the current model. In addition to the Name, Alias, Description, and Icon fields that are filled in when creating the model, this tab also displays the current status of the model, its creation date, latest updates, and other relevant configurations as follows:
Title Field can be any of the Text fields in your model and is required in order to publish the model. This field will be used to display the model in the model listing dashboard, when creating entries, or in other listings within Codex.
Featured Media, while not mandatory, can be any of the media fields in your model and will serve as the primary media field for the entries of the model.
Default Upload Folder can be used to select a folder that will serve as the default upload location for images when users upload them to any of the media fields within the entry.
Concurrent Restrictions functionality allows users to specify whether multiple editors can access the entry editor simultaneously. This feature offers two options:
Restricted: This option restricts the entry editor to be accessed by only one editor at a time, and concurrent access is not permitted.
Unrestricted: This option allows more than one editor to access the entry editor simultaneously, thereby enabling multiple concurrent accesses.
Lock Duration is used to set the duration for which the entry will remain locked after the last user activity. It is represented in minutes.
Preview URL functionality enables you to set up the preview URL for the entries in your model. Once you've configured this URL, it will activate the "Entry Preview" function for all entries in the model.
The "Specify applicable labels" option can be used to select the labels that will be displayed and can be assigned in the respective entries by this model.

General Tab
Fields Tab
To build a Model, you need to define the type of data that will be included in its entries by using fields. The Side Panel contains a Fields tab that displays a list of all the available fields that can be added to your model. The fields are classified into three primary categories: Basic Fields, Codex Fields, and General Fields.
Basic Fields: These fields are used for specific purposes and have strict rules for their use. Examples of Basic Fields include Number, Media Content, Rich Text, JSON Object, Boolean Field, Text, Reference, and Date and Time fields.
Codex Fields: These are native fields that are specifically designed to handle dynamic and rich-content data. They can be used for a variety of purposes, including Rich Content, Authors, Tags, Sections, and URL fields, all of which are managed within Codex.
Plugin Fields: These fields are custom fields that are incorporated into the organization for specific use based on the organization's purpose.
General Fields: These fields are more versatile and are used for building and managing the structure of the content.
For detailed information on how to add and work with fields, please refer to the documentation section on Adding Fields in Model Editor.

Fields Tab
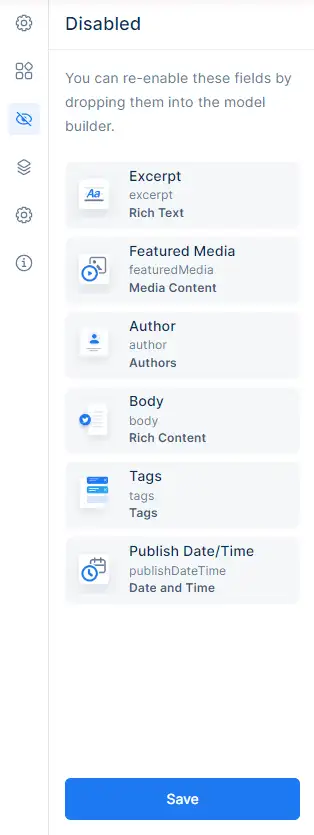
Disabled Tab
The Disabled Fields tab shows a list of fields that were once created but later removed from the model editor. Codex stores these fields for future use, enabling you to quickly restore them to the model editor by dragging them from the Disabled fields tab. This feature allows for efficient management and organization of fields within your model, ensuring that all required fields are readily accessible when necessary.
Disabled Fields Tab
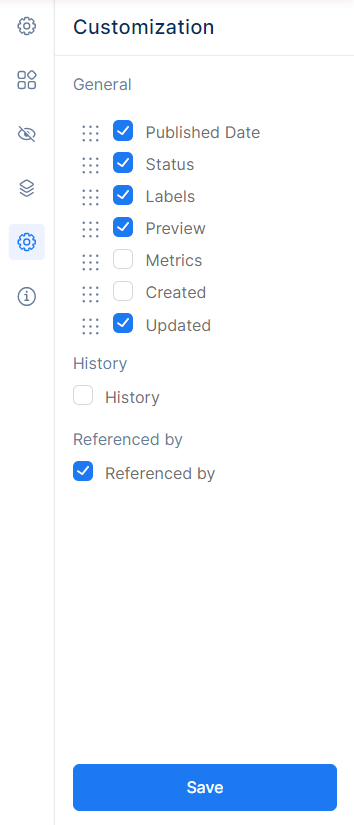
Customization Tab
The Customization tab enables you to control the appearance of the Side Panel for your model entries. This allows you to select which information or options will be displayed on the right Side Panel of the entry editor and organize them in the order that is most suitable for your model.
For example, if you have created a model that will not be displayed in your front-end applications, you may not require the Preview functionality, and as a result, you can disable it.
In addition to controlling the appearance of the side panel for entries from this content model, there are more options related to the model as follows:
Hide model in create button: Selecting this option hides the corresponding model in the create button within entries listing, while the model remains visible in other cases.
Hide Clone Button: Selecting this option removes the Clone button from entries created by this model in the entries listing.
Customization Tab
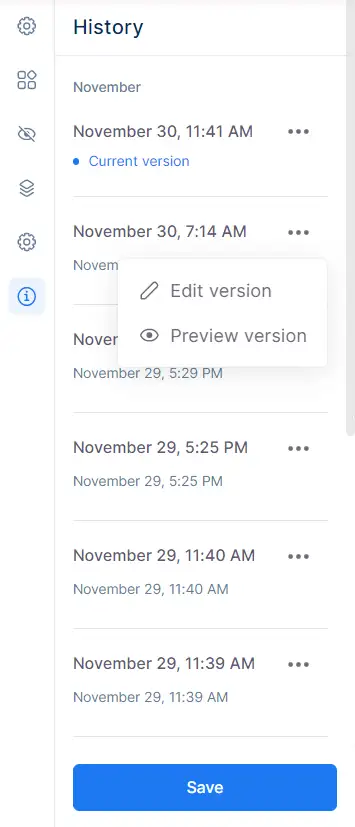
History Tab
The History tab displays all the versions of the current model since its creation. Every time you start a new session or make changes in the model builder, Codex saves a new version of the model. For each version of the saved model, you can Preview the version by clicking on its title. Additionally, you can access the "Edit version" action, which allows you to modify or rename the version name. This option is useful for identifying and distinguishing specific versions of the model. It enables you to track and manage changes made to the model over time, providing a convenient way to revert to previous versions if needed.
History Tab
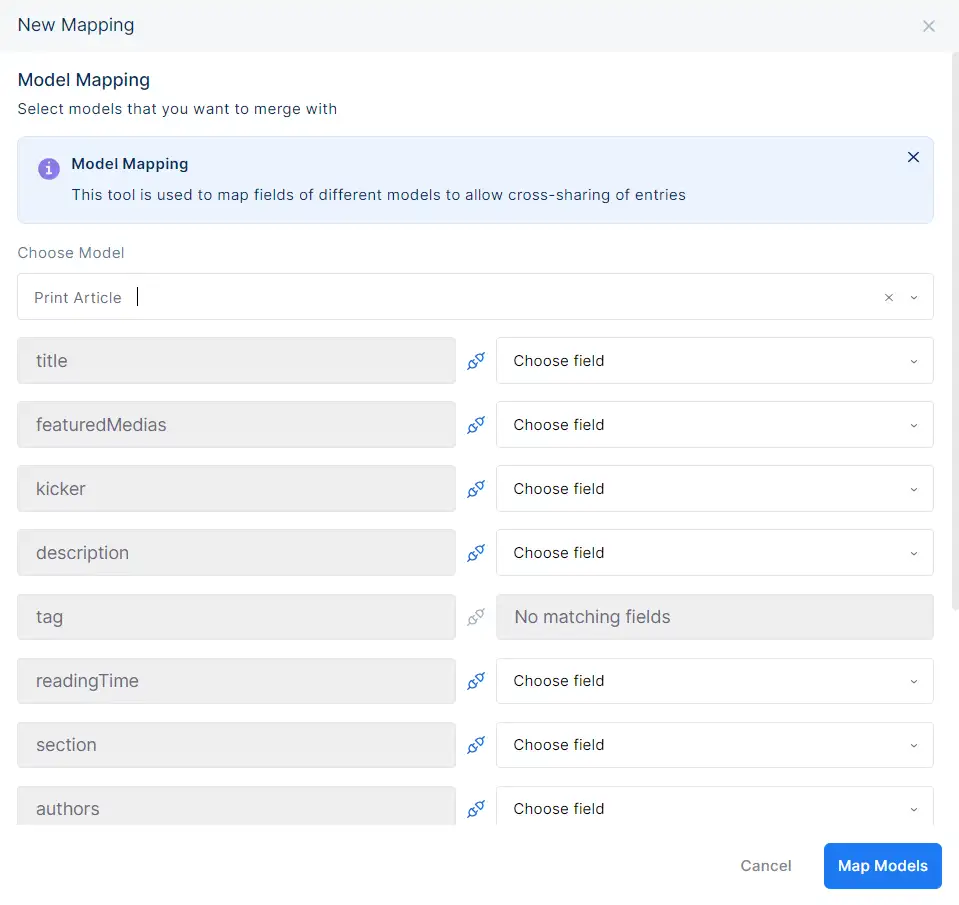
Mapping Tab
The Mapping Tab allows you to choose the model from which you want to map the content and is used to map fields of different models to allow cross-sharing of entries. This tab contains the “Create New Mapping” button; clicking on it will open a slide modal. Within the modal, there is a "Choose model" option, which opens a dropdown menu including all the models created in this organization. After selecting a model, all the fields of the respective model will be displayed, and you can choose to match and map them with the fields of the selected model. There are two possibilities:
When a field of the respective model has no matching fields with the selected model.
When a field of the respective model has matching fields. In this case, you can select the matching fields for each respective field.
Besides the fields, there's also the option to allow assets to be cloned during the entry cloning process. When enabling this option, you can also choose the target folder to which the cloned assets will be transferred.
After selecting the desired fields and options, you can click on “Map Models” at the bottom of the modal to establish the mapping between the chosen models' fields. This feature facilitates the exchange and synchronization of data between different models, enhancing the flexibility and interoperability of the content within your organization.
Create a New Mapping