
Working with Assets

The Asset Management Hub in Codex is the main environment for uploading, storing, and managing your digital assets. These assets can be used to create your content in Codex or to organize your digital files for convenient access.
Assets can be shared across your organization and used on any site, as long as the user has the necessary permissions. You can upload assets directly from your device or connect to third-party asset providers and store all your assets under a single hub in Codex.
Watch Demo

To access the Asset Management Hub, navigate to the "Assets" option in the Codex Components dropdown menu. Once you're in the Asset Management Hub, you can view, upload, and manage your assets in folders.
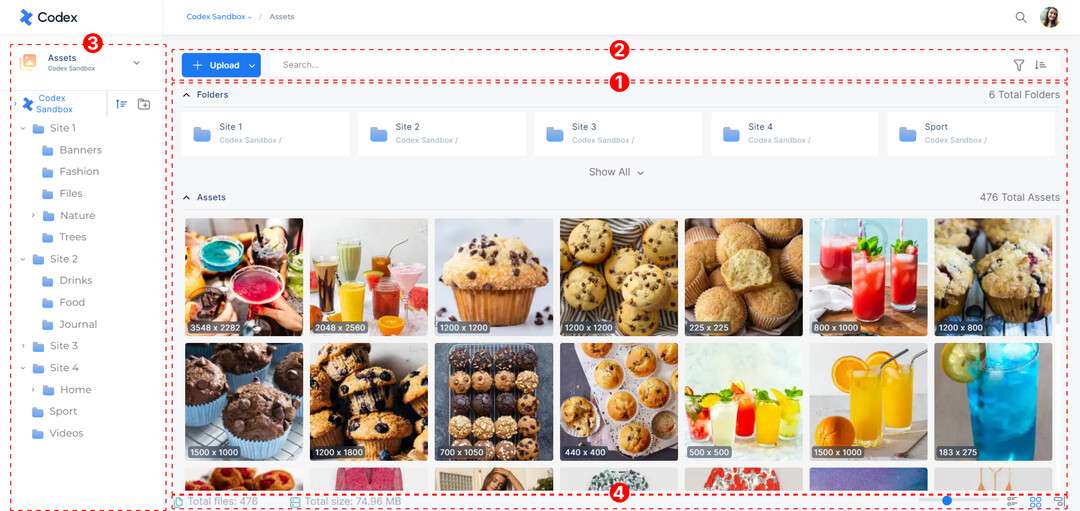
Asset Management Hub
1) The Assets Overview section displays all assets in your current folder location. From here, you can navigate through your assets, expand and edit asset metadata, access the Image Editing Tool, or delete assets.
2) At the top of the page, you'll find the "+Upload" button and a search bar for easy access to your assets. Additionally, there are buttons to filter and sort your digital assets, making it easier to find specific assets in your library. For more, refer to the Searching, Filtering, and Sorting the Assets resource.
3) The left Side Panel can be used to create and list folders, allowing you to organize your assets within your organization.
4) At the bottom of the page, a bar provides additional details about the selected folder. You can also adjust the view of the Assets Overview section using predefined view options, or by increasing or decreasing the asset preview size.
Uploading Assets
To upload new assets in the Asset Management Hub, you can click on the "+Upload" button and choose assets from your device, or you can drag and drop the assets from your device to the Assets Overview screen.
To upload new assets in the Asset Management Hub, follow these steps:
Select the desired folder or subfolder where you want to upload the files.
Click on the "+Upload" button located at the top of the Assets Overview.
Choose one or multiple files from your computer by either browsing through your device or dragging and dropping the files onto the Assets Overview screen.
The uploaded files will appear at the top of the Assets Overview, indicating a successful upload.
In addition, you have the option to upload assets from external photo library tools integrated with Codex, such as mBase and VP. To upload images from these external tools, click on the arrow next to the "+Upload" button. A dropdown menu will appear, allowing you to select the desired external tool for uploading assets.
Codex supports various types of digital assets, including images, videos, documents, PDF files, GIFs, and more. Please refer to the list of supported asset formats for Codex for a comprehensive understanding of the accepted file types.
Images | Audios | Documents | Other |
.jpg | .aac | .woff | |
.jpeg | .mp3 | .txt | .otf |
.jfif | .mid | .csv | .ttf |
.png | .wav | .json | .ttc |
.tif | .weba | .yaml | .fot |
.tiff | .toml | .fon | |
.gif | .js | ||
.webp | .xls | ||
.ico | .xlsx | ||
.svg | .xml | ||
.avif | .css | ||
.sass | |||
.scss | |||
.doc | |||
.docx | |||
.docm |
Editing Assets
By hovering over the assets, five icons will appear, providing quick access to the following options:
Asset Metadata
Image Editing Tool
Focal Point
Save option, and
Delete option
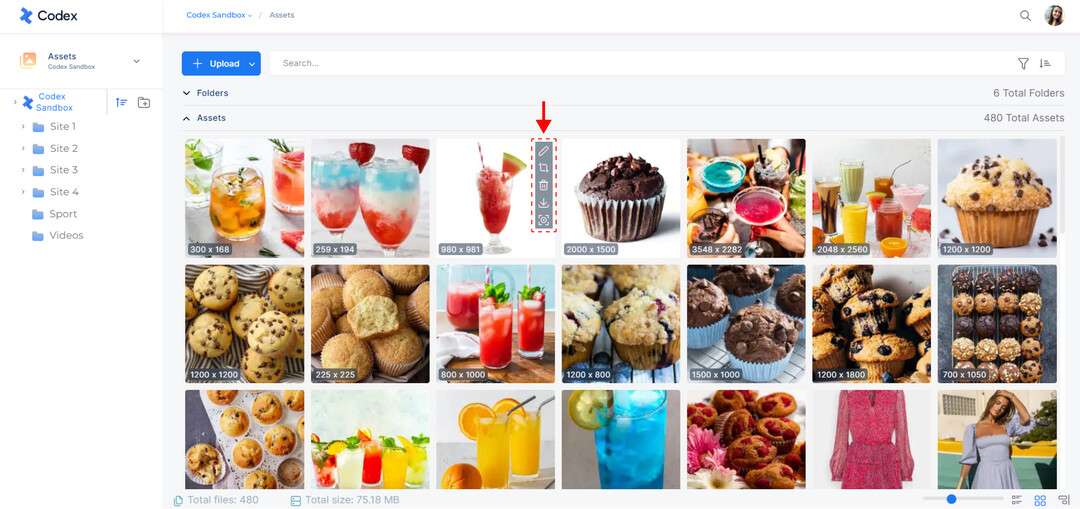
Quick Actions in Images
Asset Metadata Management
Asset Metadata encompasses important details specific to each asset. Adding metadata is essential as it aids in searching and locating relevant assets when needed. In Codex, the metadata for Images is categorized as follows: Asset URL, General Information, File, and Logs.
Asset URL is the web address that specifies the location of the image inside Codex. You can use this URL to share the asset with your colleagues.
General information section include main asset information such as:
Labels are used to assign to assets for various purposes such as specifying, categorizing, filtering, and others.
Title represents the image's meaning. A well-written title is important for both users and the search engine in Codex. Users can see the title of your image after downloading it to their device.
Caption is used to describe the image, which is usually used when adding an image to a story you are creating in Codex.
Alt text is a contraction of the “alternative text” that refers to a short written description of the image, which is displayed if the image cannot be loaded to your front applications.
Source represents the point or place from which the image originates.
Author name can be used to insert the author of the image.
Copyright can be used for assigning the copyright of the image.
Tags are used to identify the category of the image, or to simply add some searchable keywords which make sense within your use case.
Expiration Date can be used to add a timeframe on the period when the image can be used in an entry in Codex. If the image contains an expiration date, it will become unavailable to insert to an entry past the expiration date.
File section includes some image details such as:
Resolution, which refers to the number of pixels in the image.
Size, which refers to the size of the file in bytes or kilobytes.
Name, which is the name of the file.
Type, which refers to the file type, such as PNG, JPG, or GIF.
Duration (of a video), which refers to the length of time it takes to play the entire video from start to finish.
Logs section includes the stored created and last update date of the assets within the Asset Management Hub, as well as the users who have created or updated it.
Create date log displays the date when the image is uploaded and the user who uploaded it.
Latest update log displays the date when the image is updated and the user who updated it.
In addition to the current asset metadata, you can also access the History tab, which contains all the versions of the asset's metadata. Each asset version displays the version title, the user who created it, as well as the date and time of creation. Actions available for each asset version can be found in the three-dot menu, including:
Rename: Allows you to change the title of the version.
Restore: Allows you set the version as the current one.
Compare: Allows comparison between the corresponding version and the current one. Like entries, you can utilize the "Show only differences" option and "Select all changes". Clicking the "Merge Changes" button on the bottom of the comparison page merges the selected metadata fields, creating a new version.
It's important to note that asset versions cannot be deleted.
Bulk Editing
In addition to editing individual asset metadata, you have the ability to select multiple assets and edit them simultaneously. Here's how you can accomplish this:
Select the assets that you want to edit.
Right-click your mouse.
Select the "Edit selected assets" option.
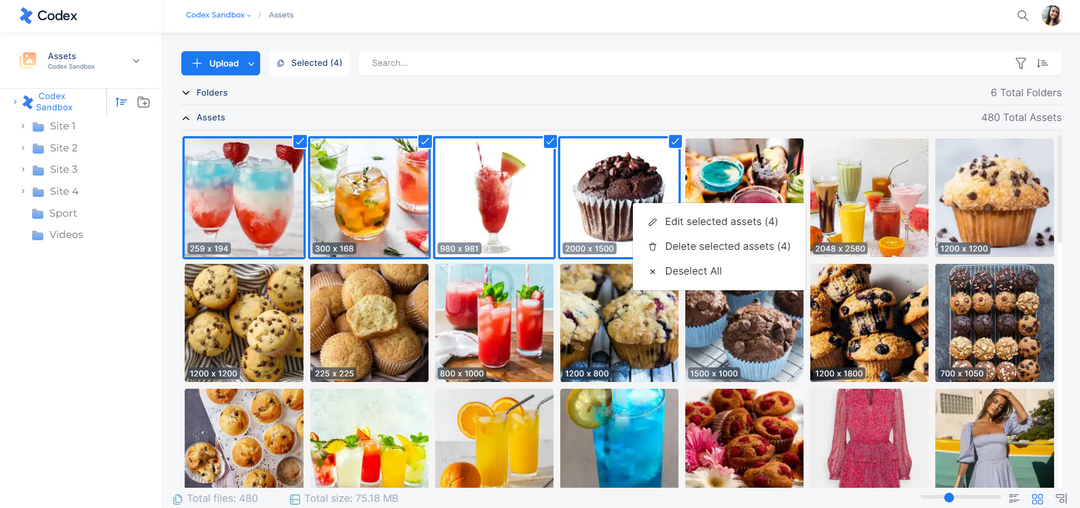
Bulk Actions in Assets
A modal will appear displaying the selected assets and the metadata fields that can be edited.
By checking the checkbox next to a field, you can add or modify the metadata for that field. Any changes made will be applied to all the selected assets and overwrite their current metadata.
Once you have filled in the desired metadata fields, click the "Save" button to save the changes.
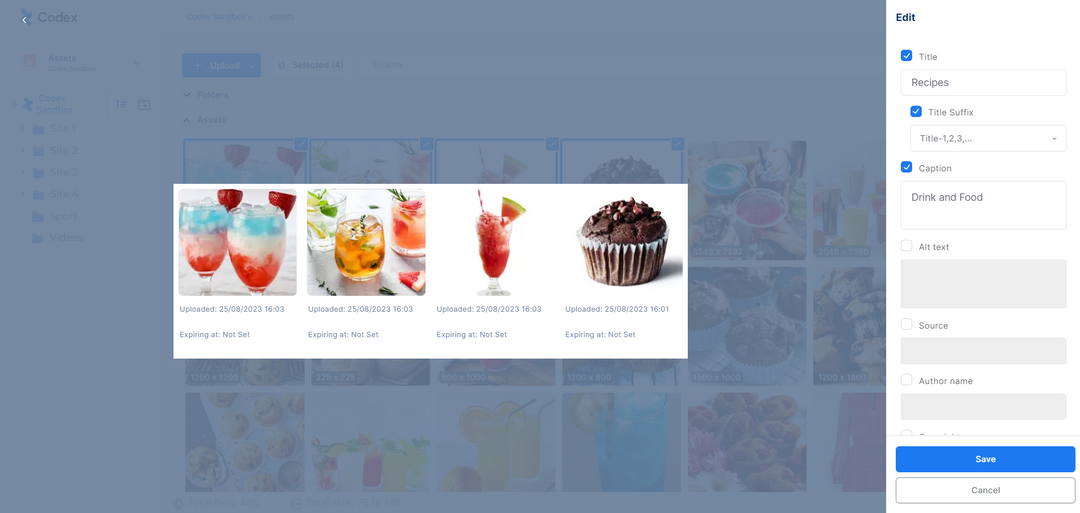
Bulk Edit of Asset Metadata
Note that only the modified metadata fields will be overwritten for the selected assets. For example, if you edit the title of an asset, only the title metadata will be updated for the selected assets, while other metadata will remain unchanged.
Additionally, you have the option to deselect the selected assets or perform bulk deletion if needed.
Image Editing Tool
Codex offers an integrated Image Editing Tool within the Asset Management Hub. If you need to quickly edit an image before using it in your story, you can use the tool to crop, adjust brightness, or pixelate parts of the image, among other options.
To apply the changes made using this tool, you can save the edited image as a new asset by clicking the "Save as New" button.
Note that the original image will remain unchanged and will be saved as a separate asset with the edits applied.
Crop image
When cropping an image, you have the following options:
Presets provide you with a few predefined cropping dimensions such as Facebook Post, Instagram Story, and more.
Fixed ratio allows you to crop the image using a specified ratio, e.g., 2:1.
Free selection allows you to crop specific parts of the image by free selection.
Resize option allows you to define a custom width and height of an image using pixels or ratios.
These options allow you to crop and resize images in Codex based on your specific requirements.
Image properties
The Image Properties tools enable you to rotate or flip the image using the specified icons to switch sides up and down, or left and right. Additionally, you can manipulate the image's colors by adjusting the percentage of brightness, contrast, or saturation.
Pixelation tool
If you need to blur or pixelate specific parts of an image in Codex, you can utilize the Pixelation tools. These tools allow you to select the desired area of the image that you want to pixelate and then specify the pixelation strength as a percentage.
Shapes
This tool allows you to add different shapes and colors to specific parts of images that you want to hide. You can choose between quadrilateral, triangle, and circle shapes, as well as default colors, or manually select a color.
Organizing Assets in Folders
To improve asset organization in your Asset Management Hub, you have the option to create folders and subfolders on the left side panel of Codex, in addition to the Asset Root Folder within your organization.
To create a folder within your organization, follow these steps:
Click on the [+] button located at the top right of the sidebar.
A modal will appear, prompting you to enter the Name of the Folder.
Click on the "Add" button.
The newly created folder will now be displayed on the left side panel.
Additionally, you have the flexibility to arrange folders according to your requirements. To do this, simply click on the Order button and choose one of the following options for alphabetical sorting:
A-Z Ascending
Z-A Descending
You can easily manage your folders and subfolders by right-clicking on the selected folder or subfolder and choosing from the following quick actions:
New button allows you to create a subfolder.
Edit option allows you to rename the folder or subfolder.
Delete option allows you to delete the folder or subfolder.
Note that you can change the location of a folder or subfolder by simply dragging and dropping it into the desired position within the folders.
When deleting a selected folder or subfolder, you will need to choose one of the following options:
Delete the folder and all assets in it: This option will delete the entire folder, including all assets in it.
Delete the folder and move the assets to the parent folder: This option will delete the folder, and move the assets to the parent folder. If it is a main folder, then the assets will be moved to the organization root folder. If it is a subfolder, then the assets will be moved to the parent folder based on the hierarchy.