Webhooks

Webhooks in Codex are a feature that enables the sending of data (payload) from Codex to an external URL using user-defined requests.
Webhooks are asynchronous HTTP callbacks that enable bi-directional communication between Codex and external systems. Codex platform sends real-time notifications of specific events or changes to registered external systems, allowing for automated responses. By creating webhooks, external applications can automatically receive updates and respond accordingly, eliminating the need for manual data syncing.
Webhooks in Codex provide a means to transmit the content from Codex to external sites, accounts, or pages. This functionality is particularly useful when there is a need to notify others of changes, share content, or perform similar actions.
Please note that in order to create, view, edit, or delete webhooks, you need to have the respective permissions within the Builder tab of your belonging team.
To access webhooks in Codex, follow these steps:
Navigate to the Builder component in the left side menu.
Select the Webhooks link in the left side menu.
You will be directed to the Webhooks Listing Dashboard, where you can create new webhooks, edit existing ones, and delete them as needed.
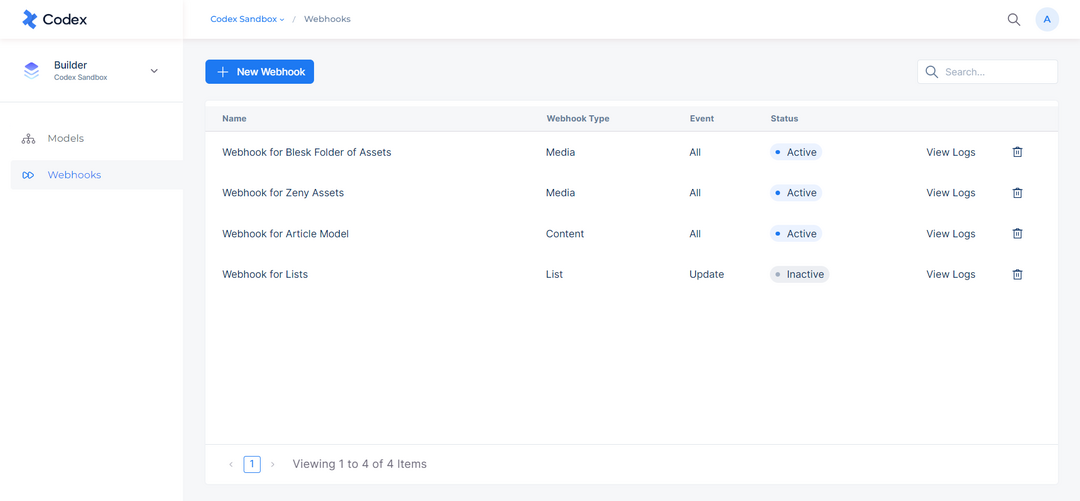
Webhook Listing Dashboard
Webhooks Listing Dashboard
The Webhooks Listing Dashboard contains several columns that provide useful information, such as:
Name of the webhook.
Webhook type (Content, Lists, Author, Media, Section, URL, or Tag).
Event that triggers the webhook (Insert, Autosave, Delete, Publish, Update, Unpublish, Schedule, Unschedule, and Archive).
Success Rate which indicates how often the webhook operations are completed without encountering any errors or issues.
Status (Active or Inactive).
View logs for webhook log viewing.
Delete option represented with a trash icon.
To access a webhook for viewing or editing, hover over it and click on it. To find a specific webhook, you can use the search bar located at the top right of the page. Additionally, the "+ New Webhook" button located at the top left of the page can be used to create a new webhook.
Creating a new webhook
To create a new webhook, follow these steps:
Navigate to the Builder component in the left side menu.
Select the Webhooks link to access the Webhooks Listing Dashboard.
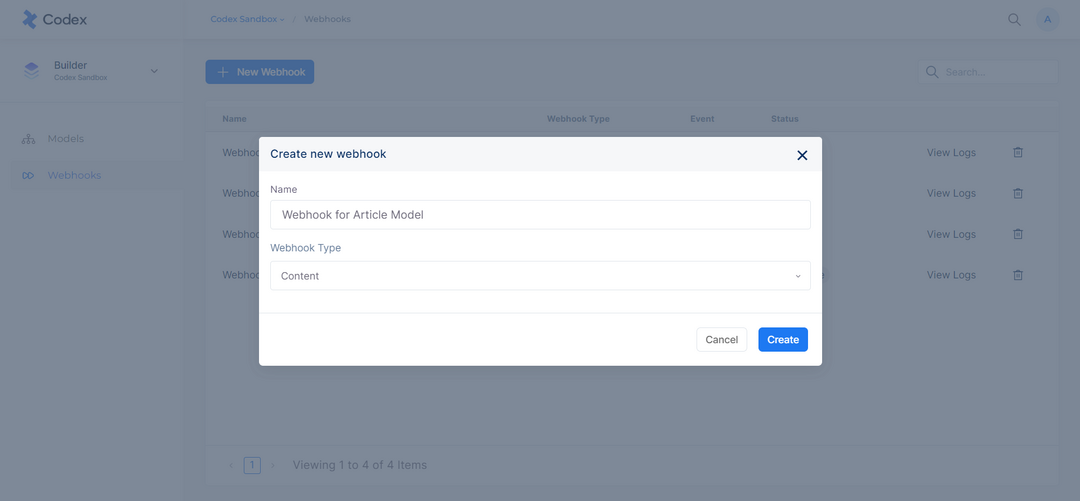
Locate the "+ New Webhook" button located at the top left corner of the page and click it.
A modal will appear, prompting you to enter the necessary information for the new webhook such as its name and type depending on your intended use.
Once all the required fields are filled, click the "Create" button located at the bottom of the modal.
You will then be directed to the Webhook management page, where you can continue to configure the webhook's settings and parameters specific to the selected webhook type.
After filling in all the relevant fields, click the “Create” button located at the bottom of the Webhook management page to complete the creation process.
Create new webhook modal
Webhook Management Page
The Webhook management page in Codex facilitates effective inter-system communication and optimizes workflow through the configuration of various parameters. These parameters include the endpoint URL, trigger events, failure retry settings, headers, filters, content type, payload data, and webhook enablement status.
URL
The URL section is an essential component that must be completed. It includes a dropdown menu where you can select one of the available HTTP methods, such as POST, GET, PUT, PATCH, and DELETE. Each method serves a distinct purpose and should be chosen based on the specific requirements of your use case. Furthermore, the URL field allows you to input the endpoint URL that corresponds to the desired event.
POST | The HTTP POST method is used to send data in the request body, typically used to create a new resource on the server. In the context of Codex, this could be used to create a new item and send the details of that item to an external application. |
GET | The HTTP GET method is used to retrieve information from the server. In the context of Codex, this could be used to retrieve details of an item from the Codex platform and send it to an external application. |
PUT | The HTTP PUT method is used to update an existing resource on the server with new data. In the context of Codex, this could be used to update an existing item and send the updated details to an external application. |
PATCH | The HTTP PATCH method is used to update a specific part of an existing resource on the server with new data. It allows for partial updates, meaning that only the fields that need to be updated are sent in the request. In the context of Codex, this could be used to update specific fields of an item and send the updated details to an external application. |
DELETE | The HTTP DELETE method is used to delete a specific resource on the server. In the context of Codex, this could be used to delete an item from the Codex platform and send a notification to an external application that the item has been deleted. |
Triggers
In the context of webhooks, triggers are specific events that initiate the sending of a webhook request. The webhook management page within Codex enables the configuration of triggers, allowing users to select triggers for all events or specific events. The specific events available for selection include actions such as Insert, Autosave, Delete, Publish, Update, Unpublish, Schedule, Unschedule, and Archive, which are available as options depending on the webhook type. The capability to select specific events ensures that only relevant and essential updates are communicated through the webhook, optimizing the process of keeping external systems informed of changes within the Codex platform.
Failure Settings
The Failure Setting field within the webhook management page allows for the configuration of the number of attempts that an external application should undertake in order to establish communication with a specific webhook. For instance, setting the number of attempts to 4 implies that if the external application is unable to establish communication with the webhook on the first attempt, it will make an additional 4 attempts before discontinuing the communication process.
Headers
Headers are an extra source of information for each webhook call you make. Their job is to represent the meta-data associated with a webhook request and response. They are displayed at the top of the created webhook. By default, webhooks in Codex are created with the following headers:
RequestDateTime: Represents the time of the updated data in the webhook.
X-Codex-Event: Represents the type of event trigger.
X-Codex-Webhook: Represents the name of the webhook.
traceparent
Elastic-apm-traceparent
Tracestate
Additionally, you can create custom headers in the webhook management page:
Add Custom Header: create a custom header to match your purpose or webhook
Add Secret Header: create an authenticator for your needs
Add HTTP Basic Auth Header: create an authenticator for your needs
Note: it is not possible to add both Secret Header and a HTTP Basic Auth Header at the same time, you can only add one of them.
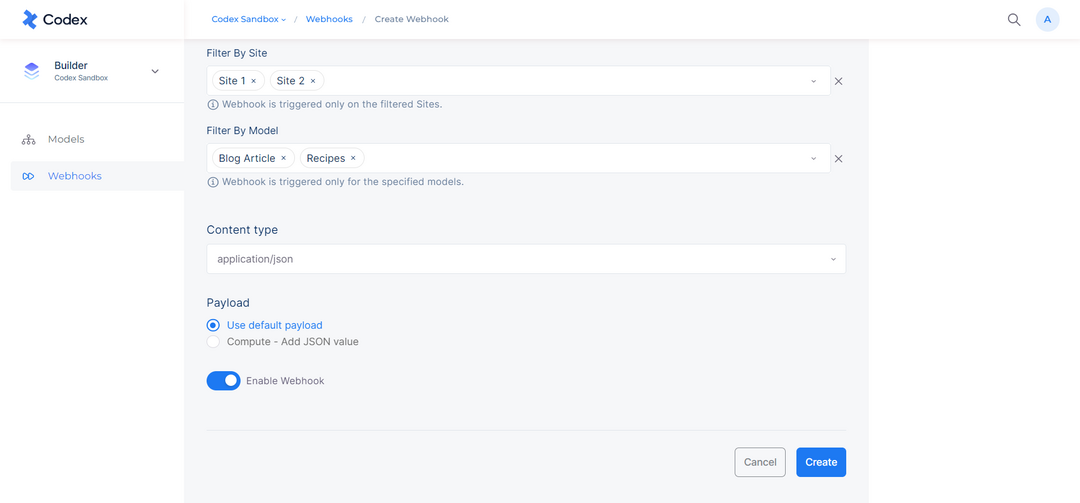
Filters
The Filters option within the webhook management page allows for the targeted selection of specific data within the Codex platform to be included in the webhook. These filters can be applied based on various criteria such as ID, site, model, asset type, and asset folder, depending on the webhook type.
Filter by ID: This option allows you to specify specific ID's that will trigger the webhook.
Filter by Site: This option allows you to filter webhook triggers to specific sites within Codex.
Filter by Models: This option allows you to specify specific models that will trigger the webhook.
Filter by Asset Type: This option allows you to filter webhook triggers to specific asset types such as images, videos, or documents.
Filter by Asset Folder: This option allows you to filter webhook triggers to specific asset folders within the Codex platform.
Content type
The Content Type field in the webhook management page refers to the format in which the data being sent in the webhook will be displayed. The options available in the dropdown menu include:
"application/json", which denotes that the data will be formatted in the JSON format.
"application/json; charset=utf-8", which denotes that the data will be formatted in the JSON format and encoded in UTF-8.
"application/x-www-form-urlencoded", which denotes that the data will be formatted in the "application/x-www-form-urlencoded" format.
"application/x-www-form-urlencoded; charset=utf-8", which denotes that the data will be formatted in the "application/x-www-form-urlencoded" format and encoded in UTF-8.
Payload
The Payload tool within the webhook management page allows for the selection of the data that will be communicated through the webhook. Users can choose from two options:
Use default payload, which utilizes pre-configured data for the webhook.
Compute - Add JSON value, which allows for the manual input of a JSON value for the webhook, providing more flexibility and customization in the data that is communicated through the webhook.
Enable Webhook
The webhook status toggle within the webhook management page enables users to activate or deactivate a webhook. By switching the toggle to the "on" position, the webhook is set to an active status, allowing for real-time communication between the Codex platform and external systems.
View Logs
In the context of webhooks, logs refer to a comprehensive record of events and data generated by a webhook. These logs serve a variety of purposes, including troubleshooting, monitoring performance, and providing an auditable record of webhook activity for security and compliance. The logs tab typically includes information such as the time of request, the event that triggered the webhook, and the response code. Additionally, the logs may include a "delivered" status, indicating whether the webhook was successfully delivered. By clicking on "View details", a modal window opens, displaying more detailed log information, including the response code, number of attempts, request time, content type, and request details.
On the dashboard, you can utilize the search bar to quickly locate specific logs with ID, as well as filter logs using a variety of criteria based on the webhook type. The system filters icon provides a dropdown menu for further filtering options, such as: entity, model, media type, author, section, site, response code, event, and delivery status. Additionally, there is a "Refresh" button at the top right of the dashboard, allowing users to refresh the logs and potentially capture new or updated information.

Logs ashboard
Use Case
In this example, we will demonstrate the process of creating a new Webhook for the Article Model. The following steps outline the procedure:
In the Webhooks Listing Dashboard, click the “+ New Webhook” button located in the top-left corner.
A new modal will appear where you can enter the name of the webhook. In this case, we will name it “Webhook for Article Model” and select its type as Content.
Click the “Create” button located at the bottom of the modal.
In the Webhook management page, there will be several fields that need to be filled out. In the URL section, specify the HTTPS method, which in this case will be POST, and enter the endpoint URL. This means that for each item created, it will send the details of that item to an external application.
In the Triggers section, select the specific events that will cause a request in the webhook. These events are Insert, Autosave, Delete, Publish, Update, and Unpublish. This means that for each event selected, it will trigger and send an update or request in the webhook.

In the Failure Settings section, set the number of attempts to "4". This means that if the request is not sent on the first try, it will attempt to send 4 times.
In the Filters section, set filters that will be part of the webhook. For example, in Filter by ID, set two IDs such as “1256” and “32556”. In Filter by Site, choose "Site 1" and "Site 2". In Filter by Model, choose "Blog Article" and "Recipes". By setting these filters, this means that the Articles with these specific IDs, that are on Site 1 and Site 2, and also created by the model named Blog Article and Recipes, will send data in this webhook.
In the Content type, select the application/json type and format.
In the Enable Webhook toggle, switch it to On, which means that the webhook is active.
Click the “Create” button located at the bottom of the Webhooks management page.