
Teams and Permissions

In Codex, teams are created as a group of members who are granted specific permissions to access certain functionality within the platform.
Permissions are set at the organization level and apply to specific members who are organized into teams. These permissions, which include content and other modules of Codex, can be set for each team and will apply to all members of it. What users can see in Codex is determined by the teams they belong to.
To set up teams and assign permissions in your organization, follow these steps:
Navigate to the Administration component in the left side menu.
Select the Teams link from the left side menu.
You will be directed to the Teams listing dashboard, where you can create teams and add members to them, as well as define access to different modules within Codex.

Teams Listing Dashboard
Teams listing dashboard
The Teams listing dashboard displays several columns, including:
Name of the team;
Description of the team;
Team members list represented by user pictures.
Quick actions, represented by three dots, which includes options to edit and delete the team as well as remove a member from the team.
At the top right of the dashboard, you will find a search bar that enables you to search for specific teams. At the top left of the dashboard, there is a button that allows you to create a new team.
Creating a new team
To create a new team in your organization, you must have permission to do so through Administration permissions. The steps to create a new team are as follows:
Navigate to the Administration component in the left side menu.
Select the Teams link from the left side menu.
Click on the "+ Add team" button located at the top-left of the Teams listing page.
A side panel will open, allowing you to enter the Name, Description and Members of the team.
Once this information is filled, click the "Create" button at the bottom of the side panel.
You will be directed to the General team information tab.
General Team Information
General team information
The General team information section provides an overview of the team, including:
Name of the team;
Description of the team;
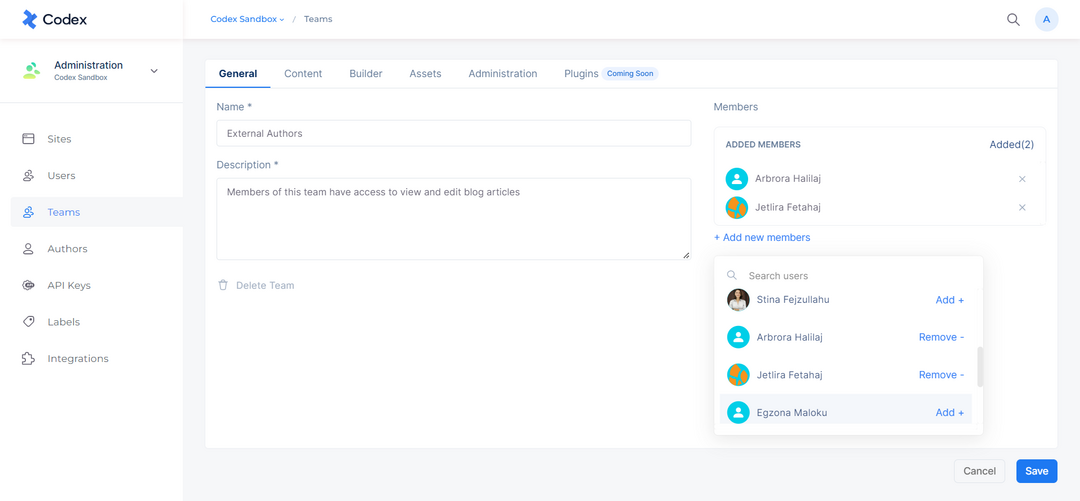
Members section, which lists all members of the team.
The "Add New Member" button allows you to add new team members by using the modal to search for and select specific individuals to join the team.
The "Remove" button allows you to remove members from the team.
The "Add All Members" button allows you to quickly add all members of your organization.
Delete Team button, which allows you to delete the current team.
API keys should be granted permissions by adding them to a team, just like users.
Permissions Management
Teams are created to establish specific rules and permissions that apply to team members. When accessing an existing team or creating a new one, you will be directed to the Team management dashboard where you can set permissions for that team. These permissions are organized into different types, such as: Content, Builder, Assets, Administration, and Plugins. Each type manages access to the respective modules of Codex.
There are two types of Rules that can be combined for Entries, Entry Labels, and Assets: Allow and Deny. Allow rules grant explicit access to perform a specific action in the organization, whereas Deny rules limit the access provided by Allow rules. Anything that is not explicitly stated by Allow rules will be denied. In case of conflicting permissions within one Team, Deny rules always override the Allow rules. On the other hand, in case of conflicting permissions in two different Teams, Allow rules have precedence over Deny rules, and hence, override the Deny rules.
Content permissions
The Content permissions allow you to manage access and actions for all components at the site level, such as Entries, Entry Labels, Sections, Lists, URLs, Tags, and Shared Views Permissions.
Entries permissions
The Entries permissions refer to rules that are added to allow users specific actions on entries within certain models, sites, labels, and their respective fields. In the Entries permissions, you can use the "+ Add Rule" to define Allow or Deny rules using a combination of the following parameters:
Actions: This parameter restricts user access based on the following actions: View, Create, Edit content, Edit label, Delete, Publish, Unpublish, Take Over Lock entries, and Manage Versions. You can select all actions or specific actions for this rule. The default value is 'All Actions'.
Models: This parameter restricts user access based on selected Models of the organization. In combination with other parameters, users can be restricted to perform certain actions only for Entries of the Models selected here. The default value is 'All Models'.
Sites: This parameter restricts user access based on the selected Sites of the organization. Based on this selection, users will be able to perform certain actions only for specific Sites from the Codex menu. The default value is 'All Sites'.
Labels: This parameter restricts user access based on content that has specific Labels. Based on this selection, users will be able to perform or not perform certain actions for Entries that have specific Labels. The default value is 'All Labels'.
Fields: This parameter restricts user access based on Model fields. In combination with other parameters such as Models, Actions, and Sites, users will be able to perform or not perform certain actions on specific Fields of the Model. The default value is 'All Fields'.
Entry Labels permissions
The Entry Labels permissions refer to rules that are added to allow users specific actions on labels within certain models, sites, and labels. In the Entry Labels permissions, you can use the "+ Add Rule" to define Allow or Deny rules using a combination of the following parameters:
Labels: This parameter restricts user access to the selected Labels of the organization. In combination with other parameters, users can be restricted to perform certain actions only on the Labels selected here. The default value is 'All Labels'.
Actions: This parameter restricts user access to Labels based on the following actions: Add and Remove. You can select all actions or specific actions for this rule. The default value is 'All Actions'.
Models: This parameter restricts user access based on selected Models of the organization. In combination with other parameters, users can be restricted to perform certain actions on Labels only for Entries of the Models selected here. The default value is 'All Models'.
Sites: This parameter restricts user access based on the selected Sites of the organization. Based on this selection, users will be able to perform certain actions on Labels only for specific Sites from the Codex menu. The default value is 'All Sites'.
Labels: This parameter restricts user access based on content that has specific Labels. Based on this selection, users will be able to perform or not perform certain actions on Labels for Entries that have specific Labels. The default value is 'All Labels'.
Section permissions
The Section permissions are part of the Content permissions that specify access to perform certain actions on Sections. The Section permissions are valid only for the Sites allowed in the rules above. The permissions for Sections are explained below:
Manage Section: Allows users to perform all actions in the Sections, including create, update, and delete.
Create Section: Allows users to only create new Sections, but not perform any other actions on the created Sections.
View Section: Allows users to view all the Sections that have been created in 'view-only' mode.
URL permissions
The URL permissions are part of the Content permissions that specify access to perform certain actions on the URLs in the URL Management interface. The URL permissions are valid only for the Sites allowed in the rules above. The permissions for URLs are explained below:
Manage URL: Allows users to perform all actions in the URLs, including creating custom URLs, updating existing URLs, and deleting custom URLs.
Create URL: Allows users to only create custom URLs but not perform any other actions on the existing URLs.
View URL: Allows users to view all the URLs that have been created in 'view-only' mode.
Tag permissions
The Tag permissions are part of the Content permissions that specify access to perform certain actions on the tags in the Tag Management page and Tag Field in entries. The Tag permissions are valid only for the Sites allowed in the rules above. The permissions for Tags are explained below:
Manage Tag: Allows users to perform all actions in the Tags, including creating custom tags, creating suggested tags, updating existing tags, and deleting tags.
Create Suggested Tag: Allows users to create suggested tags in the Tag field of an entry from third-party APIs based on their organization's integration, but not perform any other actions on the existing tags.
Create Custom Tag: Allows users to only create custom tags in Tag Management page and Tag Field in an entry, but not perform any other actions on the existing tags.
View Tag: Allows users to view all the tags that have been created in 'view-only' mode.
Note that if none of these permissions are selected for the team, members can still view and add saved tags in the Tag Field of entries specific to the specified models and sites of the organization set in the rule.
List permissions
The List permissions are part of the Content permissions that specify access to perform certain actions on Entries Lists. The List permissions are valid only for the Sites allowed in the rules above. The permissions for Lists are explained below:
Configure List: Allows users to configure the Entries Lists.
Manage List: Allows users to perform all actions in the Entries Lists, including create, and update.
Create List: Allows users to only create Entries Lists, but not perform any other actions on the created Lists.
View List: Allows users to view all the Lists that have been created in 'view-only' mode.
Delete List: Allows users to delete all the Lists that have been created.
Use Case One
Here is an example of how to create a team and set permissions related to content using Allow and Deny rules in the Content permissions. This example outlines the steps we will take to create a team called "External Authors" and set rules that allow the team members to view and edit only specific fields in the entries of the "Blog Article" model for "Site 1" that have the label "To Edit."
To make the example, we do the following steps:
Navigate to the Content tab and then the Entries section.
Click the "+ Add Rule" button.
In the Actions input, select the "View" and "Edit Content" options.
In the Models input, select the “Blog Article” option.
In the Sites input, select the "Site 1" option.
In the Labels input, select the “To Edit” label.
In the Fields input, select the specific fields of the entries that you want.
By default, the Allow/Deny rule is set to "Allow" for the selected permissions.
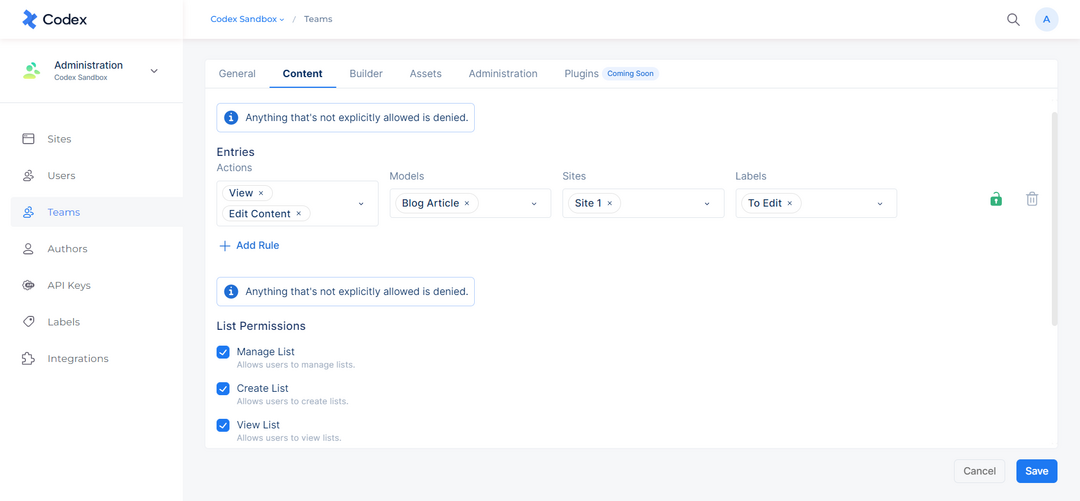
Content Permissions
Based on the above-set rules, members of this team can:
View only 'Site 1' in the Codex menu.
View only entries of the 'Blog Article' model that have the label 'To Edit'. All other entries should not be visible in the entries listing.
Edit content only in the specified fields of the entries in the 'Blog Article' model that have the label 'To Edit.' All other entries should not be visible in the entries listing.
Use Case Two
In this case, we will create a team called "Editors" and set an 'Allow' rule to allow all actions for all fields of the "Recipe" Entries for Site 1. On the other hand, we have set another 'Deny' rule, which limits the possibilities of the 'Allow' rule by denying only 'Edit Content' for the Field 'Title'. The steps to create these rules are as follows:
Navigate to the Content tab and then the Entries section.
Click the "+ Add Rule" button.
In the Actions input, select the "All actions" option.
In the Models input, select the "Recipe" option.
In the Sites input select the "Site 1" option.
In the Labels input, select the "All labels" option.
In the Fields input, select "All Recipes fields" option.
By default, the Allow/Deny rule is set to "Allow" for the selected permissions.
Now, to set the rule denying the editors the ability to edit the title, the following steps are taken:
In the Actions input, select the "Edit Content".
In the Models input, select the "Recipe" option.
In the Sites input, select the "Site 1" option.
In the Labels input, select the "All labels" option.
In the Fields input, select the "Title" option.
In the Permissions input, select "Deny".
Click the "Save" button to save the rule.
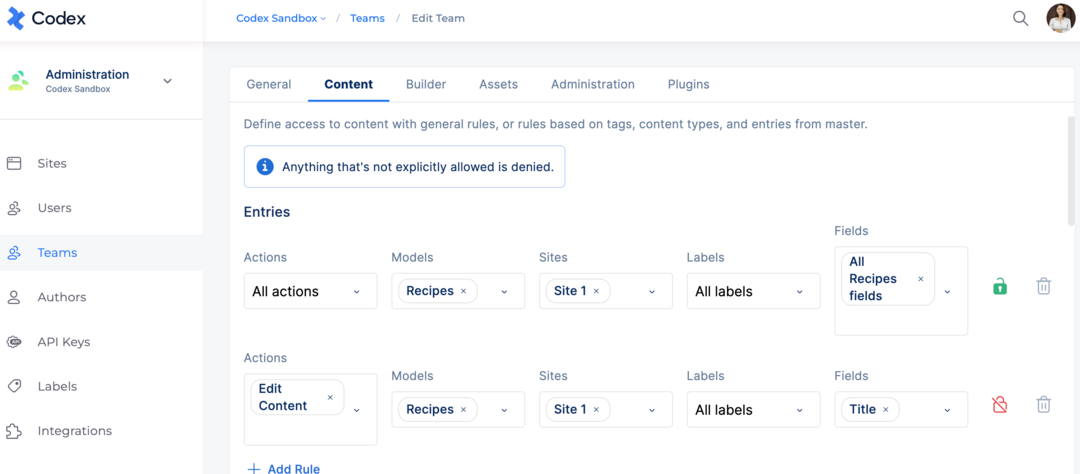
According to the above-set rules, members of this team are allowed and denied to do the following:
View only "Site 1" in the Codex menu.
Perform all available actions for the entries of the "Recipes" model, including creating and deleting entries, as well as all other actions available in the Actions input.
However, they are denied the ability to edit the title of the entries. As a result, the "Title" field is disabled in the Entry Editor.
Builder permissions
The Builder permissions contain a list of options with checkboxes that allow you to set permissions related to the builder component within the organization, specifically for Models, Webhooks, Image Presets, Jobs, and Plugins.
Model permissions
The Model permissions are part of the Builder permissions that specify access to perform certain actions on Models. If any of the Model permissions are unchecked, that component will not be visible in the Codex menu. The permissions available for Models are as follows:
Create Model: allows users to only create new models, but not perform any other actions on existing models. With this permission, users can only see their own created models, but not those created by other users.
View Model: allows users to view all models that have been created in 'view-only' mode.
Edit Model: allows users to edit any configurations set in the models, including field configurations or general model configurations such as side-panel customization and model mapping.
Delete Model: allows users to delete existing models.
Publish Model: allows users to publish models that have not been published already.
Manage Model Version: allows users to manage the versions of models, including the option to "Edit version name".
Webhook permissions
The Webhook permissions are part of Builder permissions that specify access to perform certain actions on Webhooks. In case any of the Webhook permissions are checked, this component will not be visible in the Codex menu. Permissions available for Webhooks are as follows:
Create Webhook: allows users to only create any type of new webhooks, but not perform any other actions on the existing webhooks. With this permission, users can only see their own created webhooks, but not see any other webhooks created by other users.
View Webhook: allows users to view all the webhooks that have been created in 'view-only' mode.
Edit Webhook: allows users to edit any configurations set in the webhooks.
Delete Webhook: allows users to delete existing webhooks.
Job permissions
The Job permissions are part of Builder permissions that specify access to perform certain actions on Jobs. If any of the Job permissions are unchecked, this component will not be visible in the Codex menu. Permissions available for Jobs are as follows:
Create Job: allows users to create any type of new job.
View Job: allows users to view all the jobs that have been created in 'view-only' mode.
Image Presets permissions
The Image Presets permissions are part of Builder permissions that specify access to perform certain actions on Image Presets. If any of the Image Presets permissions are unchecked, this component will not be visible in the Codex menu. Permissions available for Image Presets are as follows:
Create Preset: allows users to only create new presets, but not perform any other actions on the existing presets. With this permission, users can only see their own created presets, but not see any other presets created by other users.
View Preset: allows users to view all the presets that have been created in 'view-only' mode.
Edit Preset: allows users to edit any configurations set in the presets.
Delete Preset: allows users to delete existing presets.
Plugin permissions
The Plugin permissions are part of Builder permissions that specify access to perform certain actions on Plugins. If any of the Plugin permissions are unchecked, this component will not be visible in the Codex menu. Permissions available for Plugins are as follows:
Manage Plugin: allows users to manage any plugin in their organization.
View Plugin: allows users to view all the plugins that have been installed in 'view-only' mode.
Assets permissions
The Assets permissions are set at the folder level and allow users to manage access to the assets of a particular folder using a combination of Allow and Deny rules. Anything that is not explicitly allowed by allow rules will be denied. Asset access can be determined by the following available parameters:
Actions: This parameter restricts user access based on the following actions: View, Upload, Edit, Edit Label, Delete, Manage Versions, and Manage Folder. You can select all actions or specific actions for this rule. The default value is 'All Actions'.
Folders: This parameter restricts user access at the folder level. By default, all child folders will inherit the access of the parent folder, unless specified otherwise by any deny rules.
Use Case One
We are going to provide an example of how to create a team and set permissions related to assets using the combination of 'Allow' and 'Deny' rules. In this example, we will create a team called “Recipe Authors” and set permissions to view, upload, and edit media in a specific folder called “Site 2”. This means that the permissions will be applicable for the subfolders “Drinks” and “Food”. To create this example, follow these steps:
Navigate to the Assets permissions.
Click the "+ Add Rule" button.
In the Actions dropdown menu, select the "View", “Upload”, and "Edit" options.
In the Folders dropdown menu, select the “Site 2” option.
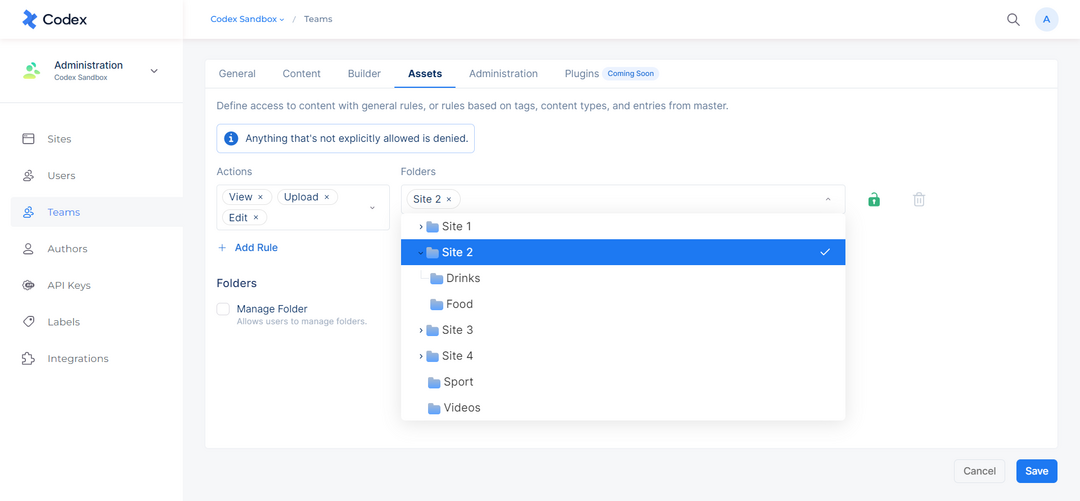
Assets Permissions
According to the above-set rules, members of this team can do the following:
See and access only the "Site 2" folder and its subfolders in the Asset Management Hub.
View, upload, and edit only assets that belong to the "Site 2" folder and its subfolders.
Use Case Two
We will be creating a new Team called "Editors" and set permissions using a combination of 'Allow' and 'Deny' rules following the steps below:
Navigate to the Assets permissions.
Click the "+ Add Rule" button.
In the Actions dropdown menu, select the "All actions" option.
In the Folders dropdown menu, select all the folders of the organization.
By default, the Allow/Deny rule is set to "Allow" for the selected permissions.
To set a rule denying the "Editors" team the ability to upload, edit, and delete media files in the "Video" folder, follow these additional steps:
In the Actions dropdown menu, select the "Upload", “Edit”, and "Delete" options.
In the Folders dropdown menu, select the “Video” folder.
In the Allow/Deny rule, select the "Deny" option for the selected permissions.
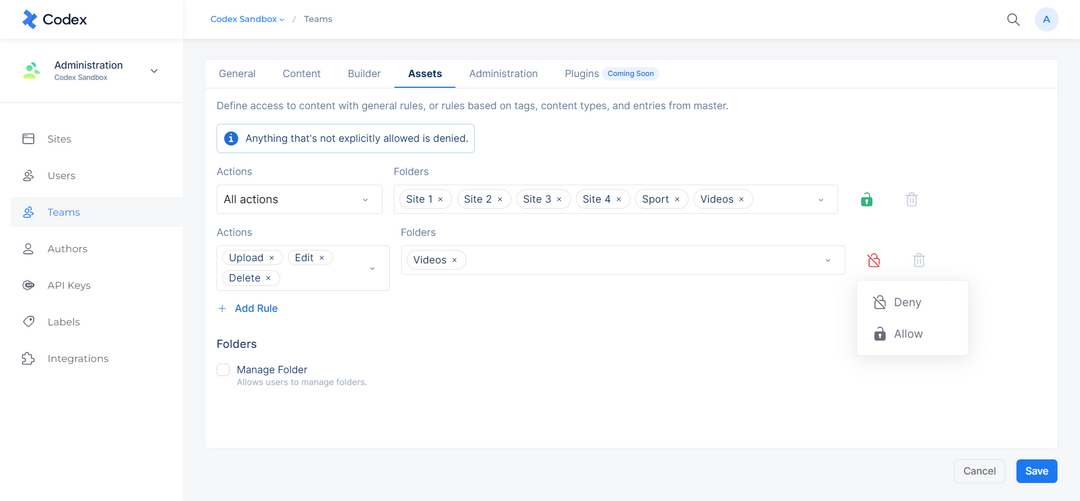
Assets Permissions
According to the above-set rules, members of this team can do the following:
Perform all actions in all Folders of the organization, except upload, edit and delete assets in the "Video" folder and all of its subfolders.
The button to upload, edit, and delete will be disabled only for the "Video" folder and all of its subfolders.
Administration permissions
The Administration permissions contain a list of options with checkboxes that allow you to set permissions related to the administration component within the organization. The Administration permissions are divided into the following:
Sites: permission to manage and view sites within the organization.
Teams: permission to manage and view teams.
Authors: permission to manage and view author accounts and profiles.
Integrations: permission to manage and view integrations with external platforms.
Users: permission to manage and view user accounts and profiles.
Labels: permission to manage and view labels for organizing content.
API Keys: permission to manage and view API keys.
Plugins permissions
Plugin permissions allow developers to control which users can access specific features of their plugins. These permissions are defined in the manifest file of the plugin and are displayed dynamically in the permissions interface.
The Plugin permissions display a list of permissions defined for each plugin, which can be enabled or disabled with a checkbox.
When a user tries to access a feature of the plugin, the plugin checks if the user has the appropriate permission to access that feature. If the user has the permission, they can access the feature. If not, access will be restricted.